You love stickers, we love stickers and kids really love stickers. The only thing better than a sticker is one that you’ve designed yourself.
SchoolStickers have offered personalised stickers for years, but now we’ve taken it a step further and we’re now giving you the ability to create your own stickers from scratch with our brand new Sticker Maker.
The Sticker Maker lets you create truly personal stickers in minutes. We’ve designed it to be as easy to use as possible – simply choose your size and shape, pick a background, enter your text and you’re done! We’ll then print your stickers and post them out to you.
To help you create the perfect sticker, we’ve put this guide together to walk you through using the Sticker Maker.
Round or Square?
The first thing you’ll need to decide is what shape you want your sticker. You can choose from circular or square stickers. If you choose to go round, you can then choose between 25mm or 35mm, square stickers are currently only available in 25mm.

You get 70 stickers on a sheet if you choose 25mm (round or square), 35mm stickers come in sheets of 35.
Now for the fun stuff
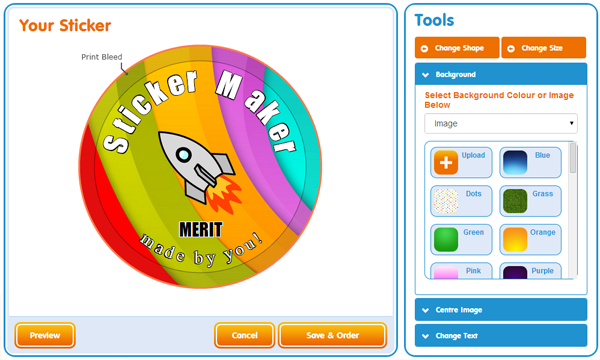
Once you’ve chosen the size and shape of your sticker, it’s time to get creative! You’ll see a live preview of your sticker on the left and all the tools you can use on the right.
If you want to change the shape/size of your sticker, just click on the ‘Change Shape’ or ‘Change Size’ link at the top of the tools section.
What’s the Print Bleed?
The print bleed area is sort of a buffer area around the edge of your sticker that needs to be there to accommodate the printing process. Anything inside this area may not be printed or may be cut off on the finished sticker, so to avoid any disappointment, make sure that your background and text fits within the main sticker area and doesn’t cross into the bleed area.
Background
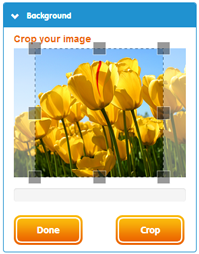
To get you started, we’ve uploaded some great backgrounds, but we know that you’ll have some great images and photo’s that you’ll want to use instead. To use your own image, click on the upload button and select the photo you want to use.
Once your image has uploaded, you’ll be able to zoom in and crop it to size. Drag the cropping tool around until you’re happy with your image, then click on ‘Crop’. Your photo will trimmed to size and the preview will be updated. If you’re happy with the background, click on done.
If you want to try another image, just repeat the process as many times as needed.
Tip: Avoid busy backgrounds. The busier the background, the harder the text is to read.
Centre Image
 You can choose to have an image in the centre of your sticker too – the process is pretty much the same as it is for setting the background. You can choose from one of our pre-defined images, upload your own or choose not to have one at all.
If you don’t have an image you can use, drop us an email and we’ll create something for you.
Tip: If you want to upload your own image, you’ll need to upload an image with a transparent background.
Change Text
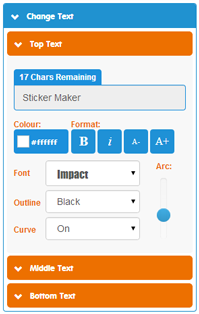
By now, your sticker should be looking pretty awesome – all that’s left is to add your text. There are three places you can add text – top, middle & bottom. All of them are optional so you could just have a photo on your sticker if you wanted.
You can use up to 30 characters on the top of your sticker, 12 in the middle and 40 on the bottom.
The controls under the text box allow you to edit the colour and formatting of the text.
The arc slider lets you adjust the curve of the top and bottom text to make it fit the curve of the sticker better. If you don’t want your text to curve, you can turn it off by changing the ‘Curve’ dropdown to ‘Off’.
You can change the position of the middle text by sliding the ‘Position’ Slider up and down.
The text can really make or break your sticker, so spend some time fine tuning the curve, font size and positioning. Your sticker is always updated in real time, so how it looks on the left is how it will be when it’s printed.
Text Tips:
- If you have a lot of text, go for the 35mm sticker
- Avoid using bold and italic if you have a lot of characters
- Avoid using same coloured outlines, it makes the text harder to read
- Choose font colours that contrast and compliment your background image.
- Avoid White on Yellow
Save & Order
Once you’ve finished your sticker, click on next. You’ll be asked to save your sticker. If you register/sign in to the site your sticker will be saved for you so that you can easily re-order it in the future.
Click on next and you’ll be asked to choose a pack size. You can buy your newly created sticker in individual sheets, mini packs and value packs.
Once you’ve completed checkout, your stickers will be sent to our print team where we’ll carefully print them, quality check them and despatch them to you. All being well, your stickers will be with you within 4-7 days (depending on where you are in the world!).
We’d love to know what you think of the Sticker Maker, so please let us know your thoughts in the comments below.